
How StableSwap Hub Reduces Slippage
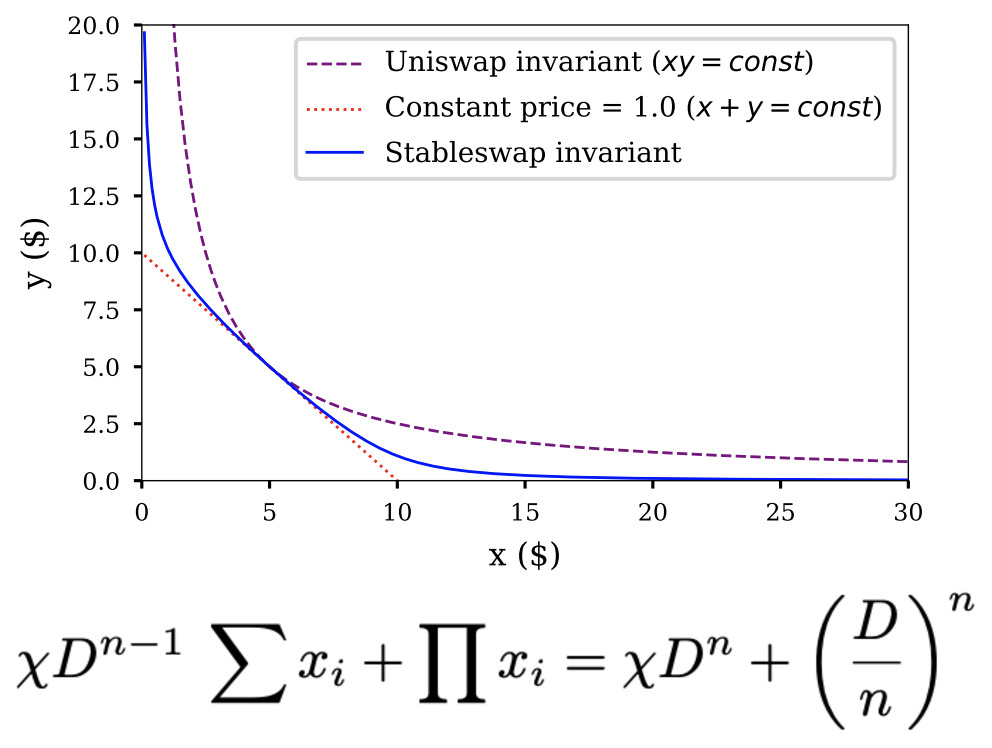
Traditional Constant Product Market Makers (CPMMs) like Uniswap V2 rely on the x * y = k invariant. This formula creates a hyperbolic curve that penalizes trades as the ratio of assets in the pool deviates from balance. For volatile assets, this is acceptable. For stablecoin pairs, where prices should remain near parity, the CPMM curve becomes a liability. As soon as a trade moves the pool slightly off-balance, the price impact spikes, creating significant slippage even for moderate trade sizes.
StableSwap Hub solves this by using a hybrid invariant that blends the constant sum model (x + y = k) with the constant product model. Near the peg (parity), the algorithm behaves like a constant sum market maker. This means the price impact remains near zero for small to medium trades, effectively flattening the curve where it matters most. The result is a liquidity environment that mimics a centralized order book for stablecoins, allowing traders to swap large volumes without the price distortion inherent in traditional AMMs.
The mechanism works by dynamically adjusting the weight of the invariant based on the current pool balance. When assets are balanced, the constant sum component dominates, offering minimal slippage. As the pool becomes imbalanced, the constant product component kicks in, preventing arbitrageurs from draining the pool entirely. This design ensures that liquidity providers are protected from impermanent loss during extreme moves, while traders benefit from the tight spreads of a stablecoin-focused exchange.
This mechanical advantage is why StableSwap Hub dominates stablecoin trading volume. By minimizing slippage, it reduces the cost of capital for traders and increases the efficiency of liquidity. For high-stakes stablecoin operations, where every basis point counts, the choice between a traditional AMM and a StableSwap algorithm is not just about yield—it’s about execution quality.
For a deeper technical breakdown of the invariant formula, refer to the Curve Stableswap vs. Cryptoswap documentation or the original StableSwap paper.
Comparing Liquidity Depth and Efficiency
When trading stablecoins, the difference between a precise execution and a costly mistake often comes down to liquidity depth. Traditional Automated Market Makers (AMMs) like Uniswap V3 prioritize capital efficiency for volatile assets, using concentrated liquidity that can evaporate quickly during large orders. This structure works well for assets like ETH or BTC, where price discovery matters more than stability. However, for stablecoin pairs, this approach introduces unnecessary slippage and impermanent loss risk.
StableSwap Hub addresses this by using a specialized invariant algorithm designed specifically for assets with pegged values. By flattening the curve near the peg, the model maintains deep liquidity even as trade size increases. This allows traders to swap large volumes without the price impact that plagues traditional AMMs. The result is a swap environment where the price remains anchored, and the cost of trading is predictable regardless of order size.
The following comparison highlights the structural differences between these two models. The data illustrates why depth is the primary differentiator for stablecoin traders who prioritize execution precision over yield farming opportunities.
| Metric | Traditional AMM (Uniswap V3) | StableSwap Hub (Curve-style) |
|---|---|---|
| Slippage for $10k Trade | High (3-5%+ depending on pool) | Minimal (<0.05%) |
| Impermanent Loss Risk | High (concentrated liquidity) | Low (flattened invariant curve) |
| Gas Efficiency | Standard | Optimized for multi-coin swaps |
| Max Coins per Pool | 2 coins | Up to 8 coins |
The data above underscores a critical reality: for stablecoin traders, liquidity depth is not just a metric; it is the foundation of their strategy. While traditional AMMs offer higher potential yields through concentrated positions, they do so at the expense of execution quality. StableSwap Hub sacrifices some yield potential to ensure that the swap itself is efficient and predictable.
This distinction becomes critical in high-stakes trading. A 3% slippage on a $10,000 trade is a $300 loss that can be avoided entirely with the right infrastructure. StableSwap Hub’s ability to support up to 8 coins in a single pool further enhances this efficiency by providing multiple liquidity routes, reducing the need for multi-hop swaps that compound fees and slippage. For traders who value precision, this depth is the only metric that truly matters.
Impermanent Loss Risks for Stablecoins
Use this section to make the StableSwap Hub vs Traditional AMMs decision easier to compare in real life, not just on paper. Start with the reader's actual constraint, then separate must-have requirements from details that are merely nice to have. A practical choice should survive normal use, maintenance, timing, and budget. If a recommendation only works in an ideal situation, call that out plainly and give the reader a fallback path.
The simplest way to use this section is to write down the must-have criteria first, then compare each option against those criteria before weighing nice-to-have features.
When to Use Traditional AMMs Instead
Traditional automated market makers (AMMs) remain the superior choice for trading volatile, non-pegged assets. While StableSwap Hub excels in low-slippage environments for stablecoins, its design constraints create inefficiencies when asset prices diverge significantly. For exotic pairs or assets with high volatility, standard AMMs like Uniswap v3 provide better capital efficiency and deeper liquidity depth where it counts.
Volatile and Exotic Pairs
Use Case: Volatile AssetsStableSwap algorithms rely on a specific invariant that penalizes deviation from a peg. When trading assets like ETH/USD or volatile altcoins, this mechanism introduces unnecessary friction. Traditional AMMs use the constant product formula ($x * y = k$) or concentrated liquidity models that naturally adapt to price discovery. In these scenarios, the "stable" constraint of StableSwap becomes a liability, widening spreads and increasing slippage for traders executing large orders on volatile pairs.
Yield Farming Incentives
Liquidity providers often gravitate toward StableSwap Hub for its predictable, low-risk yields on stablecoins. However, when yield farming incentives on traditional AMMs significantly outpace stablecoin returns, the calculus changes. Traders seeking maximum capital efficiency may find better risk-adjusted returns on volatile pairs during bull markets. The decision hinges on whether the trader prioritizes capital preservation or aggressive yield generation.
Swap Efficiency in Non-Stable Environments
Curve’s documentation notes that StableSwap is optimized for assets pegged to the same value, such as USDC/USDT or ETH/stETH.
Decision Summary
| Feature | StableSwap Hub | Traditional AMMs |
|---|---|---|
| Best For | Stablecoins, pegged assets | Volatile pairs, exotic assets |
| Slippage | Low (within peg) | Variable (depends on volatility) |
| Yield Stability | High | Variable |
| Capital Efficiency | Optimized for stability | Optimized for price discovery |
Choose traditional AMMs when trading assets that fluctuate widely or when yield incentives on other platforms offer superior returns for your risk tolerance. Precision matters for stablecoin traders, but flexibility wins in volatile markets.
StableSwap Hub Implementation Details
Use this section to make the StableSwap Hub vs Traditional AMMs decision easier to compare in real life, not just on paper. Start with the reader's actual constraint, then separate must-have requirements from details that are merely nice to have. A practical choice should survive normal use, maintenance, timing, and budget. If a recommendation only works in an ideal situation, call that out plainly and give the reader a fallback path.
The simplest way to use this section is to write down the must-have criteria first, then compare each option against those criteria before weighing nice-to-have features.
No comments yet. Be the first to share your thoughts!